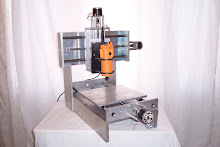
You’ve got everything ready for your CNC Router/Mill, Now what do I do?
Jogging: You may be staring at your computer screen for your router/mill and asking the question, “Now what do I do?” The answer is easy, jump in and get going! I like to start off by finding the jog commands and jogging the machine around to get a feel how the machine moves and how it sounds. In machining sound is very important, it usually lets you know when something isn’t right like spindle speeds, feed rate, oil, etc. You should have two or more speeds to jog in; high and low.
Cutting while Jogging: Next I would try out your cutting spindle manually. Secure a work piece to your table top and take some practice cuts while jogging your machine around. You will get an idea of what that sounds like and how much you can easily remove in a pass. I would start small at around .030 for your plastics and wood. If you try aluminum I would start at around.010”. Your standard jog rate should be slow enough to produce some good cuts in your material. Doing things like this will get you more comfortable with your machine and you can build some confidence from there.
Your First Program: Start with a very simple program maybe even one that was given as a sample file with your software. You need a baseline of what will work and what will not work when it comes to codes that the software recognizes. The most important parts of your program are the starting and ending code. The starting codes create the settings that the rest of the program will follow like absolute, incremental, metric units, English units, fixture offsets, etc, etc. It also specifies the safe starting position of your tool so that crashes do not occur. Your ending code is important as well because it turns off any thing that needs to be turned off (spindle, coolant, mist spray, etc.) and then sends the tool to a safe location for the end of the program. I will discuss CAM software later which helps with programming substantially.
Crashing Your Machine: Most people will crash or wreck their machines; it’s a fact of life. We are going to assume that we are using a table top sized machine and not some huge industrial CNC machine that will cost $30,000 to fix if it is crashed too hard. First things first, you must know where your program stop button is! On almost every PC based system I have used it is the ESCAPE button. When running a new program, always keep your finger above that button. Anytime you crash a machine you will need to redo your set-up (we’ll discuss set-ups later). Usually what happens in a crash is that you break your tool bit and cause your stepper motors to skip steps. Once that happens you will need to go back and retouch on your new tool bit and relocate your program start. If it is a bad crash you might have some repairs to make to your machine.
Home & Limit Switches: Do you need them? If you are a beginner I would say no. Limit switches are nice but unnecessary. You just have to know where you can cut and where you can’t cut without running out of room. These switches are needed on large machine with tool changers and encoders to help keep track of where everything is. When you run a program you run it from the program zero which is set on your work piece. When you create your workpiece zero, the program could care less where the Home location is. I would recommend them if you have a large machine where you have multiple fixtures and multiple set-ups for running different programs with different fixture offsets. Most hobbyists just don’t need the added expense and hassle of wiring limit and home switches into their driver boards or breakout boards and the setting them up in the software.
Part & Tool Set Up: Basic set ups are very easy. If you are cutting a circle, jog your machine to an area of your work piece that is clear to cut on. Make sure your work piece is securely fastened down with clamps, holding screws, double sided sticky tape, etc. All programs will start at the programmed zero point. You must know what this is before you get started. On a circle, the center of it is usually the zero point. For a simple set-up jog to a clear area that you know your circle will fit into without the spindle cutter hitting anything. You then go to your software and zero out the x and y axes. Next you slowly jog your z-axis down until you touch the top of your work piece with the tool tip. Do this very slowly so you don’t break the tool or ruin the material. Now zero out your z-axis in the software, move the spindle to a safe starting distance and hit start.
DXF’s, CAD, & CAM: You now are getting comfortable with your machine and you want to start cutting the things you need for your business. Hand programming should be dead by now. You can still do it but it just takes too long and making changes on the fly is a nightmare. Your PC has CNC control software on it that takes the G & M codes and converts it into motor code so that your motors cut what you want. If you don’t have CAM software you will definitely need it. Some CNC software comes with basic CAM software but having stand alone CAD/CAM software is the way to go. If you have a product you need to get a drawing of it if you don’t already. This will be your CAD file created on some sort of CAD software. You will save this file as a DXF file which can be imported into most CAM software. Your CAM software will then generate your G&M codes based on of this file and your inputs into the CAM software to generate the best path. You will then “post” your G & M code file and you take that to your machine and run it. CAM software is great because now you have a file for that part and your customer wants you to make it out of plastic instead of wood. Don’t start changing 1000 lines of codes by hand to fix your feed rates and depths. You will go back to your original CAM file. Perform a “file save as” and then make a few edits to the program. You will then verify the program with your software and repost the file and you are done. You let the software do the changes instead of yourself. Modular CNC is now selling Dolphin CAD/CAM Level 3 Software at a great low price to help with your software needs.
Monday, November 17, 2008
Monday, November 10, 2008
Value Design & Engineering
One of the main things that I pride myself in is that I was taught the great process of “Value Engineering” in a machine and tool design environment. The dictionary definition is very wordy and long winded so I will talk about my experience as a young designer. I had a great opportunity to start as an entry level detailer at an engineering company back in the Mid West. This was great because since everybody new I was entry level they were all willing to teach me all they could. I learned as much as I could, soaking everything in like a sponge.
In tool design, Value Engineering meant to design the best machine using the least expensive materials and components that didn’t require expensive processing. My favorite analogy came from the general manager of the company. He said, “Anybody can design a BMW. You take the best parts and components, put them in a car and the result are an $80,000 car that will run for 200,000 miles. You want to be like the Ford Escort designer that takes affordable parts and components, puts them in a car and the result are a $13,000 car that will run for 200,000 miles.”
I really related to that analogy and understood its meaning. A classic example is the oil impregnated bearing. The bronze/cast iron oil impregnated bearing has been around since the industrial revolution. Lathe spindles started off having bronze/babbitt bearings which helped fuel the industrial revolution. Its very easy to use the nice looking expensive fancy stuff but if you check the load ratings versus your application you can find a lot more affordable items that you can substitute in place of the $50.00 roller ball bearing.
Alot of my designs may not look very sleek and attractive but they work and they are strong. I try to verify that for everybody by taking videos of my machines cutting different materials. I like to show them taking large cuts through material because this shows the heavy duty capability of my machines.
Subscribe to:
Posts (Atom)